


Use the checkout settings to let customers request an invoice and enter a VAT number. Go to Invoices → Settings → WooCommerce → Checkout and click Save changes after editing the settings.
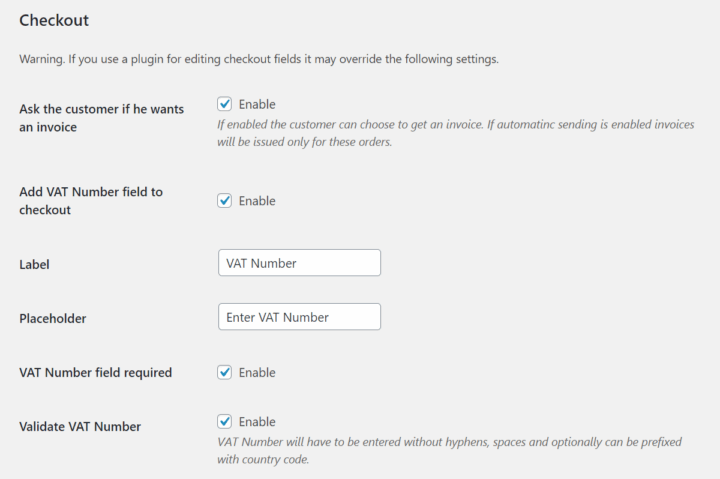
The plugin supports both the classic WooCommerce checkout and Checkout Blocks. The screenshots below illustrate the classic checkout. For a block-based checkout, see the separate setup instructions below.
Ask the customer if he wants an invoice#
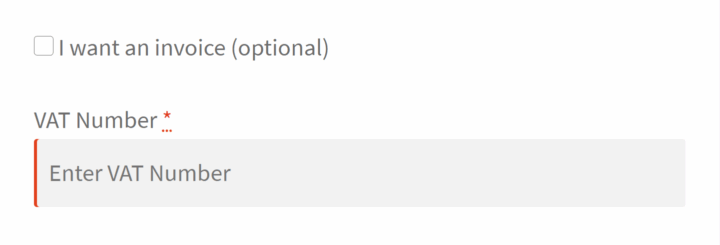
Enable this setting to display an I want an invoice checkbox at checkout. The customer's choice is saved with the order and is available when editing it.
The invoice request checkbox and the VAT number field are separate options. You can let customers request an invoice without displaying a VAT number field. If both options are enabled, the VAT number fields appear when the customer requests an invoice.
If automatic issuing is configured in Flexible Invoices for WooCommerce PRO, the plugin issues documents automatically only for orders where the customer requested an invoice. The order must also meet the configured status and other automatic issuing conditions.
If the invoice request checkbox is disabled, automatic issuing does not require an invoice request saved with the order.
Add VAT Number field to checkout#
Enable this option to add the VAT number field. If Ask the customer if he wants an invoice is disabled, the VAT field is displayed without requiring the customer to select an invoice request checkbox.
The plugin also provides a shipping VAT number field for a separate shipping address. When the billing and shipping address are shared, the plugin copies the billing VAT number to the shipping data.
In the classic checkout, the billing VAT field uses the field key and HTML ID billing_vat_number. This is useful when configuring another checkout field editor. Check the integration before adding another VAT field to avoid duplicate inputs.
Label and Placeholder#
Use Label to name the VAT field and Placeholder to add a hint inside the empty input in the classic checkout. If the label is empty, the plugin uses VAT Number.
For Checkout Blocks, edit the field labels in the invoice block on the checkout page. The block has its own text settings; the classic field's placeholder setting is not passed to the block.
VAT Number field required#
Enable this setting to require a VAT number when the VAT field is enabled.
- If the invoice request checkbox is enabled, the VAT number is required only when the customer requests an invoice.
- If the invoice request checkbox is disabled, the VAT number is required whenever the enabled field applies.
- For a separate shipping address, the shipping VAT number is also required when the shipping VAT field applies.
Customers who do not request an invoice can complete checkout without filling in the hidden VAT fields.
Validate VAT Number#
Enable this setting to check the VAT number format using the country-specific rules implemented by the plugin. Polish NIP numbers are also checked using a checksum.
Enter the number without spaces, hyphens, commas, or full stops. Include the appropriate country prefix where required by the validator. Prefix requirements depend on the number format and the customer and store country settings; do not assume the prefix is always optional for domestic customers.
If a number is rejected, check the selected address country, the country prefix, and the number itself. An empty VAT field is allowed unless VAT Number field required is enabled. When invoice requests are enabled, validation applies when the customer requests an invoice.
Country-specific format checks are not implemented for every country. Passing this check does not confirm that the number is registered for EU transactions.
Validate VAT Number is separate from online VIES verification. VIES verification is configured in the plugin's PRO EU VAT settings and can add further validation requirements.
Using Checkout Blocks#
- Configure the invoice request, VAT field, required-field, and validation options in Invoices → Settings → WooCommerce → Checkout.
- Open your checkout page in the WordPress block editor.
- Check that the checkout contains the plugin's invoice block, registered as Flexible Invoices Checkout. Add it inside the Checkout block's fields area if it is missing.
- Edit the invoice block's headings and field labels as needed, then save the page.
- Check the customer-facing checkout with the invoice request selected and unselected, and with a separate shipping address if your store supports one.
The block can display company and VAT details for the buyer and, when a separate shipping address is used, the receiver. Its company-field setting controls whether company fields are displayed inside the invoice block.
How to further customize the WooCommerce checkout page?#
A checkout field editor may override the field labels, visibility, or required-field settings described above. If a setting does not appear to work, check whether another plugin already defines the same field.
To customize checkout fields you can use Flexible Checkout Fields for the classic checkout, or Checkout Fields for Blocks for block-based checkout.