


Use the invoice settings to configure document numbering, payment terms, and notes. In Flexible Invoices for WooCommerce PRO, you can also issue invoices automatically for selected order statuses and mark invoices as paid when an order is completed.
Go to Invoices → Settings → Documents → Invoice. Click Save changes after editing the settings.
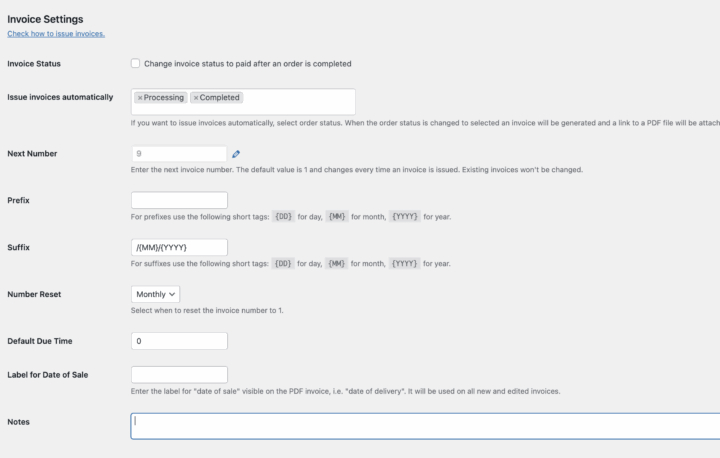
If (Beta) Gutenberg Invoice Editor is enabled in Invoices → Settings → Invoice Template, only Invoice Status and Issue invoices automatically remain in this section. Configure numbering, the default due time, and notes in the active template's Invoice settings panel. Edit the sale date label in the template content. See Gutenberg Invoice Editor – Invoice Settings.
Invoice Status (PRO)#
Enable Invoice Status to mark the invoice linked to an order as paid when the order changes to Completed. The invoice's paid amount is set to its gross total.
This updates the invoice payment status. It does not collect payment from the customer.
Issue invoices automatically (PRO)#
Select one or more WooCommerce order statuses in Issue invoices automatically, then save the changes. When an order changes to a selected status, the plugin creates an invoice using the order data if an invoice has not already been generated for that order.
For example, select Processing to generate an invoice when an order enters that status. Selecting multiple statuses does not generate a separate invoice each time the order moves between them.
Automatic issuing is triggered by the order entering a selected status. Saving these settings does not issue invoices retrospectively for orders already in that status.
The plugin uses WooCommerce's email system to send invoice notifications with a PDF download link. Configure the notification in WooCommerce → Settings → Emails → Invoice (Flexible Invoices). Delivery depends on the email being enabled and the document having a customer email address.
The following settings also affect automatic issuing:
- If the invoice request checkbox is enabled at checkout, automatic issuing applies only to orders where the customer requested an invoice. When the checkbox is disabled, the absence of an invoice request does not block automatic issuing.
- If Do not automatically issue invoices for free orders is enabled under Free Orders in the WooCommerce integration settings, orders with a zero total are excluded.
Next Number#
Enter the number to use for the next invoice. The initial value is 1, and the counter changes as invoices are issued.
In the Documents settings, click the pencil icon next to Next Number to unlock the field. Enter the required number and click Save changes.
If you are continuing an existing numbering sequence, enter the next unused number. Changing this setting does not renumber invoices already issued.
With the Gutenberg invoice editor enabled, use Next document number in the active template's Invoice settings panel.
Prefix and Suffix#
Use Prefix and Suffix to add text before and after the invoice number. Both fields support the following date tags:
{DD}– day.{MM}– month.{YYYY}– year.
For example, to create a number such as Invoice 1/10/2026 for an invoice issued in October 2026, enter:
- Prefix:
Invoice(include a space after the word). - Suffix:
/{MM}/{YYYY}.
The number 1 comes from the invoice counter. You do not need to add it to the prefix or suffix.
In the Gutenberg invoice editor, these fields are called Document Prefix and Document suffix.
Number Reset#
Select when the invoice counter should restart from 1:
- Yearly – restart numbering for a new year.
- Monthly – restart numbering for a new month.
- None – continue the numbering sequence without a periodic reset.
Choose a prefix and suffix that distinguish the numbering periods you use. For example, include /{MM}/{YYYY} when numbering resets monthly.
Default Due Time#
Enter the default payment term in days. The plugin calculates the due date from the invoice issue date. For example, enter 7 to set a due date seven days after the issue date.
You can change the due date when editing an individual invoice.
Label for Date of Sale#
Enter the label displayed for the sale date on PDF invoices. For example, replace Date of sale with Delivery date. The label is used on new and edited invoices.
This setting changes the label, not the date value. For WooCommerce orders, choose the date source separately using Date of sale on the invoice in the WooCommerce integration settings.
With the Gutenberg invoice editor enabled, edit the corresponding text in the template content.
Notes#
Enter the default notes to include on invoices. You can edit the notes for an individual invoice before saving it.
With the Gutenberg invoice editor enabled, configure the default Notes in the active template's Invoice settings panel.