





Taxes may be a challenge, but WooCommerce Tax configuration is not very complicated. This tutorial will make it easier. Learn about WooCommerce tax rates settings for products & shipping. Set VAT tax rates, choose how to display the tax, and have everything in your store set properly!
- Enable WooCommerce Tax Rates
- WooCommerce Tax Options & Tax Rates Settings
- WooCommerce Tax Class Settings
- Delete WooCommerce Tax Rates
- How to import & export WooCommerce Tax Rates
- Download ready-to-import EU tax rates (CSV)
- Generate PDF Invoices (with proper Tax Rates) with a free plugin
- Extra: About EU VAT rates, OSS, reverse charge & EU VAT number validation
Where to start?
In 1-4, you will learn about setting taxes and tax options in WooCommerce.
Then, if you want to add tax rates faster after enabling the taxes in your store, go to the 5th point.
In the 6th one, you’ll see how to issue invoices for your orders with tax rates.
Finally, you may read how to use automatic tax rate calculation & the VAT number validation for EU sales (with a plugin).
Enable WooCommerce Tax Rates
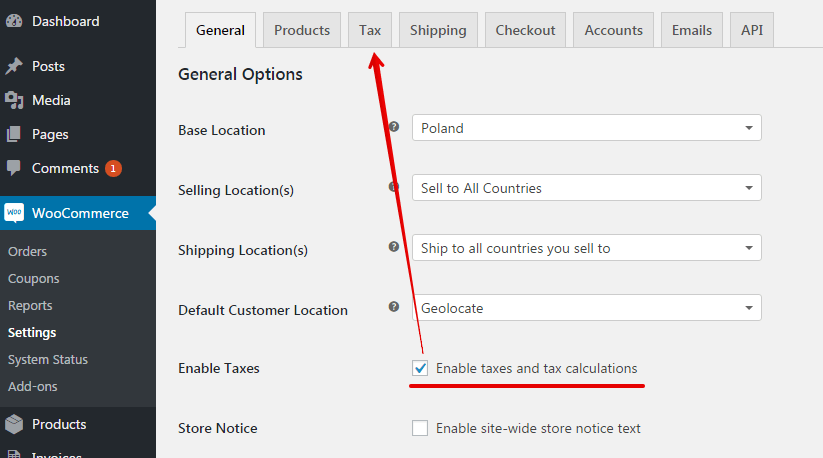
To enable WooCommerce tax configuration, go to the menu:
WooCommerce → Settings → General Options.
Then check the option Enable taxes and save changes. The Tax tab should appear.
WooCommerce Tax Options & Tax Rates Settings
First, go to the menu WooCommerce → Settings → Tax → Tax Options.
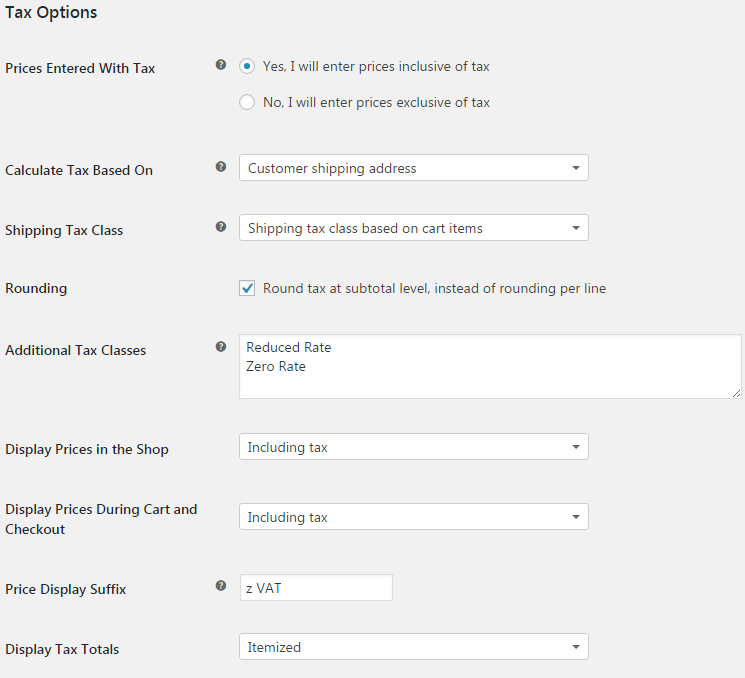
You can find most of the WooCommerce tax settings in the Tax Options section. Below I present all options step by step.
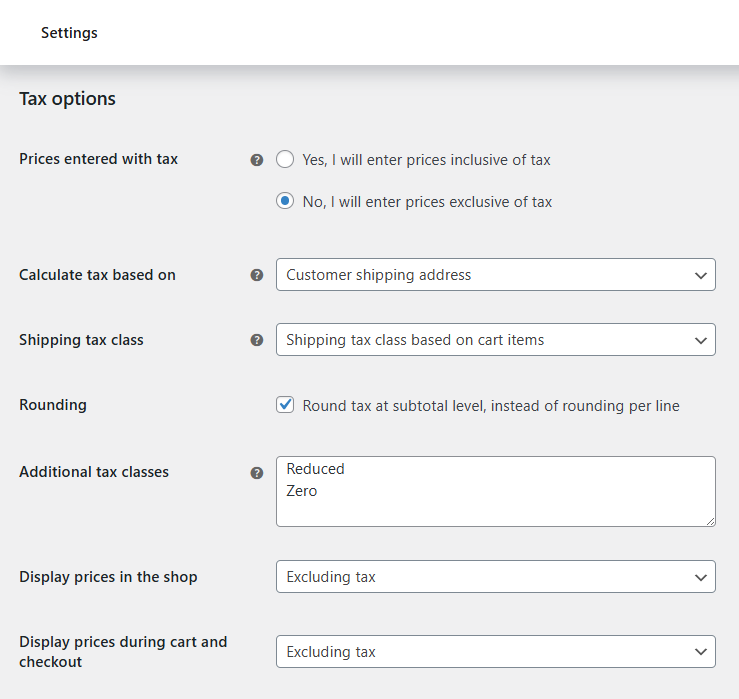
Prices entered with tax – decide whether you will enter product prices inclusive or exclusive of tax.
- Yes, I will enter price inclusive of tax – all newly created products will include tax according to the defined rate.
- No, I will enter prices exclusive of tax – all newly created products will not include tax. During checkout, the prices will be increased by tax according to the defined rate.
Calculate tax based on – select address to calculate taxes.
- Customer shipping address – you can change the default customer address in the tab General Settings.
- Customer billing address.
- Shop address – with this setting taxes will always be calculated according to shop location instead of the customer.
Shipping tax class – as a standard, tax class is applied based on products in the cart. In this case, if there are products with different tax rates in the cart, the highest rate will be applied to shipment. You can also set your own rate for shipping, which will be always applied to shipping costs.
Rounding – if you want to round tax at a subtotal level, tick this option. In Polish law, the VAT amount in invoice total is important, therefore it is not necessary to round tax per line.
WooCommerce Tax Class Settings
Additional tax classes – tax classes are attributed to products, although usually, you will probably use Standard rates, you can also add your own classes. 2 classes are entered as default: Reduced Rate and Zero Rate, but certainly, you can remove them or add new ones by entering each of them in a new line.
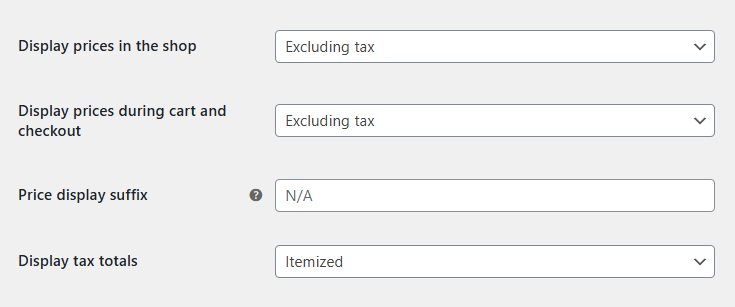
Display prices in the shop – do you want to display prices that already include tax or not.
Display prices during cart and checkout – determine if prices displayed in the cart and checkout should include tax or not.
Price display suffix – decide what should be displayed at the price. If you display prices including tax, you can use the suffix “inc. VAT” or “gross”.
Display tax totals – decide whether taxes should be displayed as a total or if they should be broken down by particular tax rates.
WooCommerce Tax Rates for Classes
Now move to the configuration of tax rates for classes. Go to WooCommerce → Settings → Tax → Tax class name.
What are tax classes used for?
In simple words, tax classes are additional “categories” for products, which are used to group products according to the tax rate.
For example, if you sell products that are taxed by a different VAT – WooCommerce tax rates, e.g. 23% and 8%. Then, it will be best for you to create two tax classes named e.g. Services (or simply 23%) and Food (or simply 8%). Later, during product configuration, choose the right tax class and a given tax will be applied to this product.
Let’s suppose now that you sell products to foreign countries, where different WooCommerce tax rates are applied. For example, in Hungary VAT rate for services is 27%, while in the UK – 20%. Now, in the tax classes section, you can set different rates for different countries by adding the Country code.
WooCommerce Standard Tax Rates Setup
By default, you can configure standard tax rates under the Standard rates class. To enter a new rate, click Insert row.
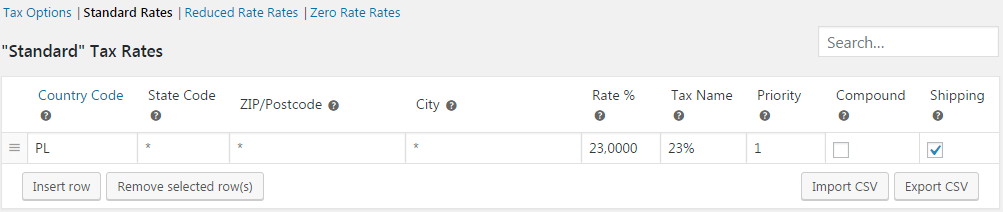
Country code – enter a two-letter country code according to standard ISO 3166-1 alpha-2. If you leave this field empty, this rate will be applied to all countries.
State code – same as above, you should enter a two-letter code or leave the field empty if you want to apply it to all states. It is only applicable to some countries.
ZIP/Postcode – enter a postcode or postcodes separating them with a semi-colon. You can also specify a range by separating the border values with a dash. Leave this field empty, if you want to apply to all postcodes.
City – specify the city or cities for which you want to apply this tax rate. In the case of more than one city, separate them with a semi-colon. Traditionally, leave it empty if you want to apply to all cities.
Standard Tax Rates
Rate % – define the rate value in percent. Apply format of four decimal places and don’t enter the mark %. Example: 23. Decimal numbers are required only if the rate is not an integer, e.g. 8.5.
Tax name – enter tax name. Tax names will be visible for customers in the shop and among others in WooCommerce invoices. Example: VAT 23%.
Priority – decide which of the rates should be applied first. Remember that a priority has to be different for different tax rates, otherwise, only one of them will be displayed when you want to issue a WooCommerce invoice. If you set many WooCommerce tax rates with various priorities for one tax class, the tax will be calculated for each of the rates.
Compound – tick this field, if it is a combination rate. Tax according to compound will be applied after calculation of the other rates, which means that the rate for which you ticked the field will be applied to the already taxed product.
Priority and Compound – when to use them
Priority and Compound are useful when national and local taxes are effective in a given country. For example, national tax can be 20% and in addition, a given state or even a city may apply an additional 2% tax, which has to be added for customers from that city. In such cases, priorities and the compound are necessary to calculate taxes properly.
Shipping – decide whether the WooCommerce tax rate should be also applied to shipping costs. Remember to select at least one rate for shipping, otherwise, shipping will not be taxed. If you select more than one rate for shipping, the tax will be applied for shipping according to the priorities.
WooCommerce Shipping Tax
The main Shipping settings are in WooCommerce → Settings → Shipping. You may add zones here with shipping costs for specific areas. You can also add shipping options and shipping classes. To properly set WooCommerce Shipping and Tax follow the steps below.
Shipping – tax & setup
- First, enable taxes in WooCommerce.
- Define your store’s address, selling and shipping locations & default customer location in the WooCommerce → Settings → General tab.
- Then add tax rates and choose WooCommerce tax settings.
- Decide how to calculate the shipping tax. Choose one option for “Shipping tax class” in the WooCommerce → Settings → Tax → Tax Options tab.
- Go to the tax rate, for example, let’s choose the Standard ones, and check the Shipping checkbox for each country. Add more rows with a specific Country code to add more tax rates. If you want to add a tax for more countries enter * in the Country code, choose the tax rate, its name, and enable the Shipping checkbox.
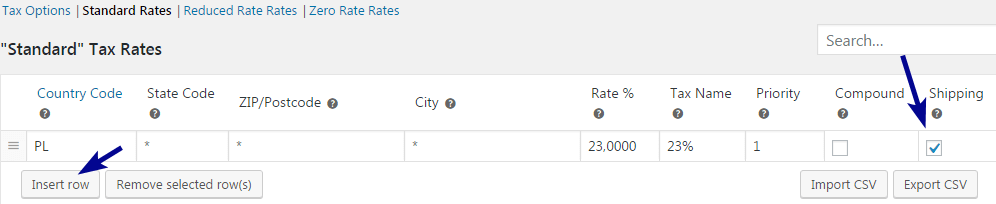
WooCommerce Shipping and Tax Settings - It will add the sales/ VAT tax to the shipping.
- Add a new shipping zone in WooCommerce → Settings → Shipping → Shipping zones. Choose countries, shipping methods, and decide about “Tax status” – if the shipping method/ cost should be taxable.
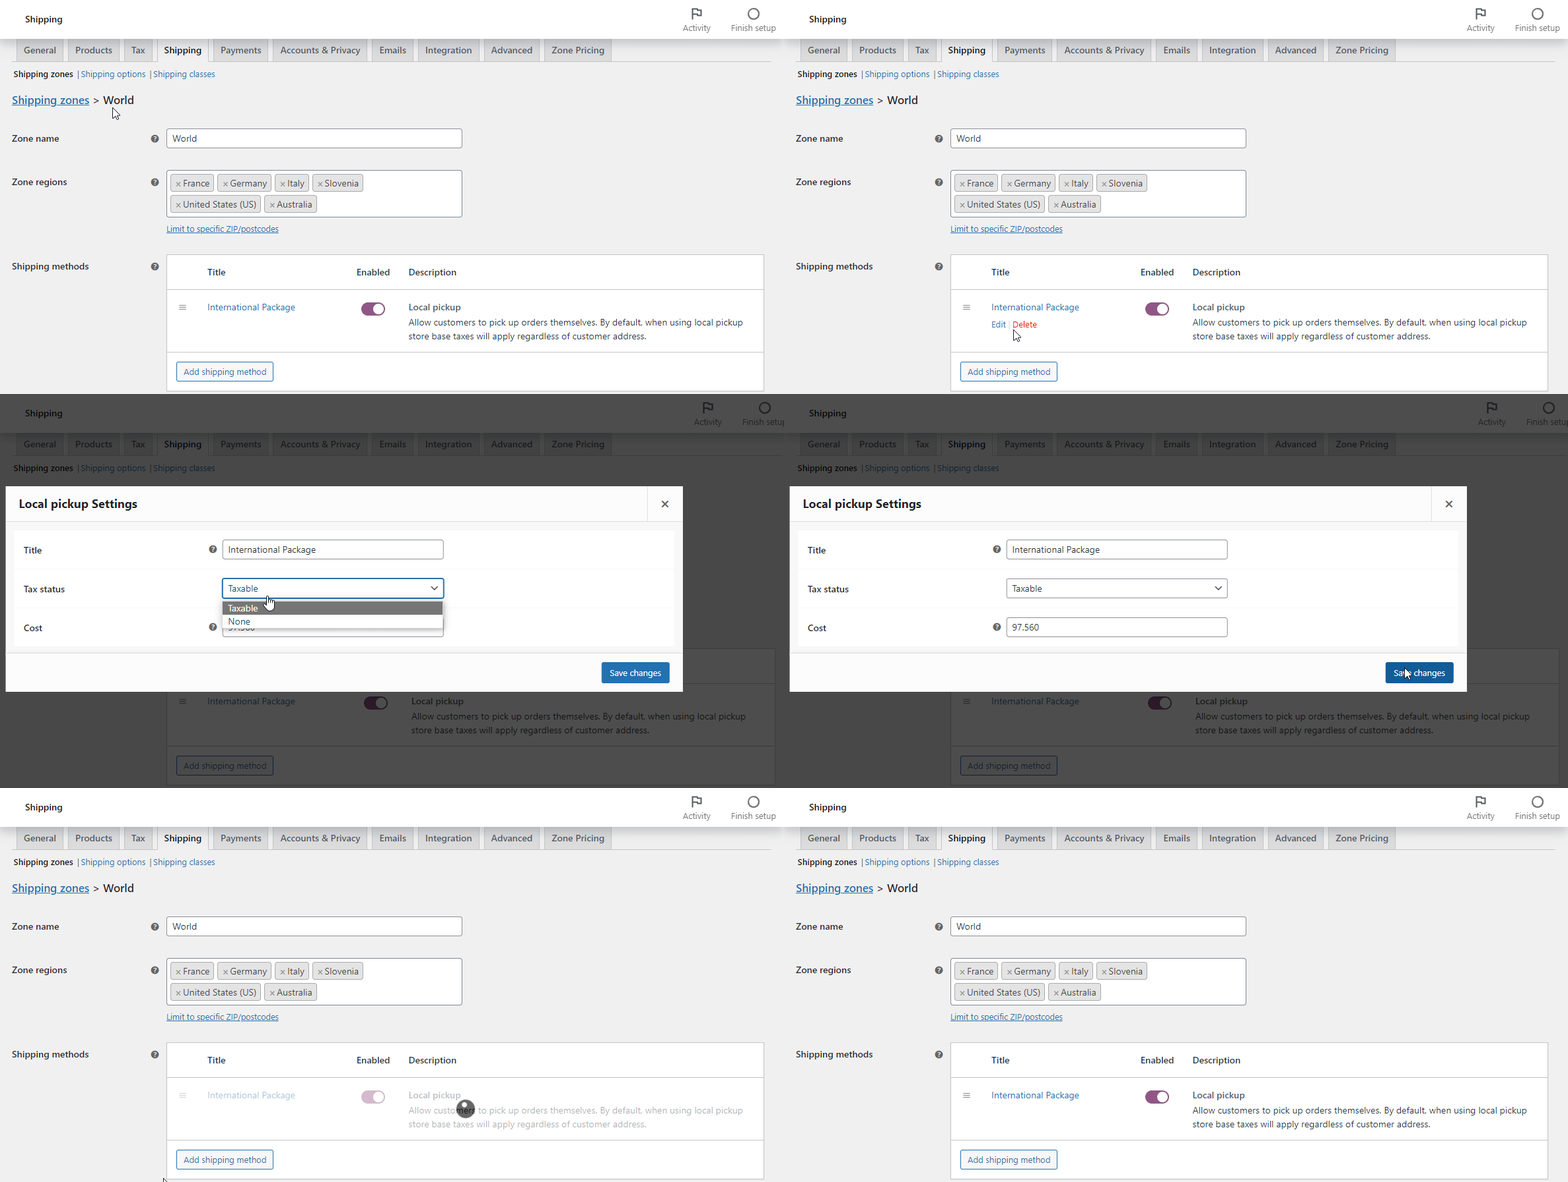
WooCommerce Add Tax For Shipping Method - Add more shipping zones and methods.
- Finally, decide if the shipping cost will be visible upfront or after customers enter addresses. You can set that in WooCommerce → Settings → Shipping → Shipping options.
- If the shipping tax is not visible, check the steps above. Especially, take a closer look at WooCommerce General Settings, the Tax Settings (“Shipping tax class” & “Calculate tax based on” options), the checkbox for shipping (for a country) in the specific tax rate settings. Finally, make sure that the shipping method is taxable.
Additional Tax Classes
Standard Tax Classes are used to determine tax rates for selected products. If you need to create additional (optional) tax classes, you can do it in the menu Tax Options. Add each new class in a new row and save the changes.

New classes will be displayed as a submenu in the menu Taxes.

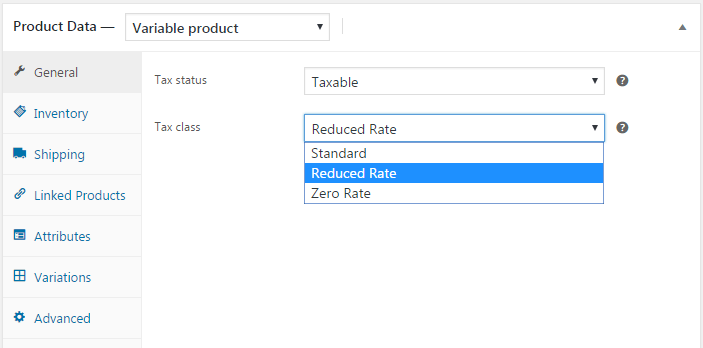
Now, you can select tax classes to products in the menu: Products → edit selected product →box Product data → tab General Settings.
If WooCommerce taxes are not working
If WooCommerce is not calculating tax properly, the tax is not showing in the cart, or WooCommerce is not adding tax to orders then:
- Check if your WooCommerce Taxes are ON,
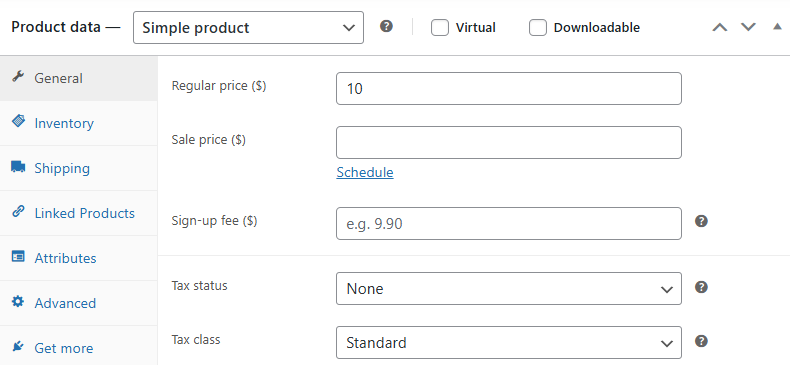
- Find out if the products in the cart are taxable – check the Tax Status in the product edit screen → Product Data → General,
- If yes, see which tax class rates are chosen,
- Check if the tax rates are set for the given class rates,
- See if the order’s country has got its rate in the class rate settings,
- If everything is correct, try to place a similar order,
- Check the “Default customer location” setting in WooCommerce → Settings → General,
- See how WooCommerce calculates taxes in the options in the WooCommerce → Settings → Tax → Tax Options tab:
- Calculate tax based on,
- Shipping tax class,
- Display prices in the shop,
- Display prices during cart and checkout.
- Check if you have any additional plugins for tax calculations and cart/ checkout customization,
- If yes, check their settings,
- Delete the cache of any plugins that you have and “WooCommerce transients” and “Expired transients” in WooCommerce → Status → Tools),
- Try to place an order in a different browser,
- Retry after disabling certain (or all) plugins except for WooCommerce,
- Check with a different WordPress theme (for example, official WooCommerce theme – Storefront),
- If these steps aren’t working, create a ticket on the WooCommerce support forum.
Delete WooCommerce Tax Rates
You can delete each rate individually or all of them in bulk.
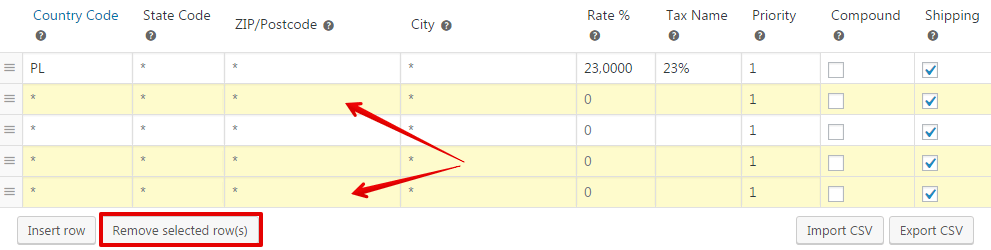
To delete rates individually, select one or many rows (hold the CTRL button or CMD ⌘ on Mac and click the selected row), click Delete selected rows and Save changes.
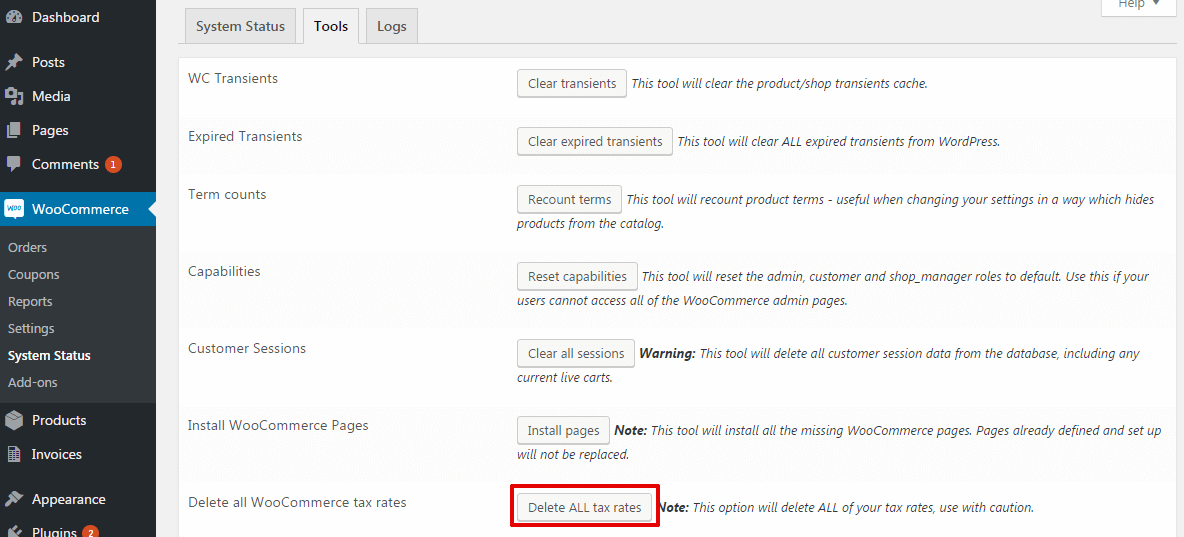
If you want to delete all rates, go to WooCommerce → System status → Tools and click Delete all tax rates.
How to import & export WooCommerce tax rates
You can import or export your configuration of tax rates. Buttons Import CSV and Export CSV are below the table for each tax class. Of course, these options are useful if you need to set or export tax rates faster.

Download ready-to-import EU CSV with tax rates
Set tax rates with the WooCommerce ready-to-import CSV with EU rates. Also, read more about setting taxes for selling and invoicing in WooCommerce for the EU.
Set WooCommerce tax rates and issue VAT invoices with a plugin
What is more, if you are interested in an invoicing plugin for your WooCommerce store (or a standalone WordPress as well), please visit the Flexible Invoices for WooCommerce plugin page. You may start with the free version of the plugin to invoice right away. Start to create invoices with appropriate WooCommerce tax rates and the plugin.
Moreover, the plugin will let you create invoices automatically for EU customers. Tax rates will depend on the type of customers (B2C or B2B). This feature is available in the PRO version of the plugin. So for B2C orders (individual customers), the WooCommerce invoice will have the right VAT of the client’s country of residence. On the other hand, for B2B orders, the invoice will have no VAT and reverse charge annotation in the invoice footer.
One plugin to invoice, also for EU VAT rates
The PRO version of the plugin has got the built-in EU VAT number validator, OSS (formerly MOSS), reverse charge support, and currency invoices. All in one plugin. Do you plan to expand and sell your products & services in the future to the EU?
Read more on how to create, download, email & print a PDF invoice in WordPress & WooCommerce.
WooCommerce Taxes & Invoicing & EU Sales
Also, with EU VAT number validation and automatic PDF invoices, you’ll be able to invoice your WooCommerce orders with ease!
If so, then you may also like to know that the plugin for EU VAT compliance.
The plugin is translated into English, French, Spanish, Italian, Polish, Dutch & has also WPML Support.
That’s all as regards tax configuration in WooCommerce. If you have any questions, of course, do not hesitate to contact us.
WooCommerce tax troubleshooting
Prices in the cart or checkout don’t have proper tax
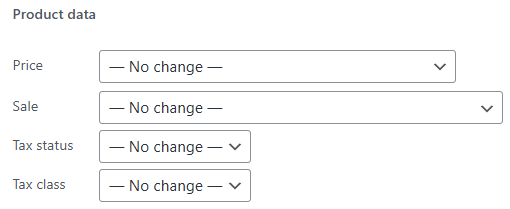
Usually, that’s because products had been added prior to WooCommerce taxes were set. In that case, one needs to update products using bulk editing and choose the appropriate tax rates.
Prices have changed after enabling some options
Did you enter prices exclusive of tax or added product prices with tax while having the first tax settings for prices without taxes? If you change the way of entering prices you need to remember to calculate or not the tax in the new and previously entered prices.
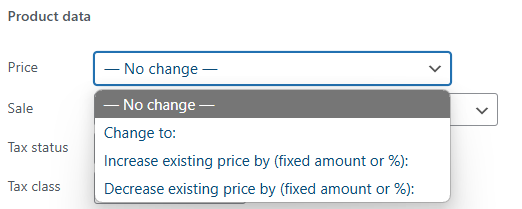
It’s possible to bulk update product prices for products:
There is a rounding problem (missing or additional 0.01)
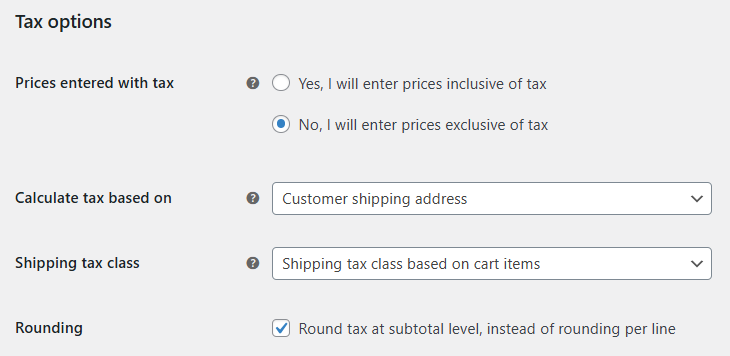
The issue can be visible for some prices in the cart when multiplied. You may try to change the way of entering prices to the second option and enable rounding. Still, you will have to check the prices after changing the settings.
No tax in the cart or checkout
In that case, first, check the WooCommerce tax settings regarding showing taxes.
It’s also possible that the product just doesn’t have the tax class.
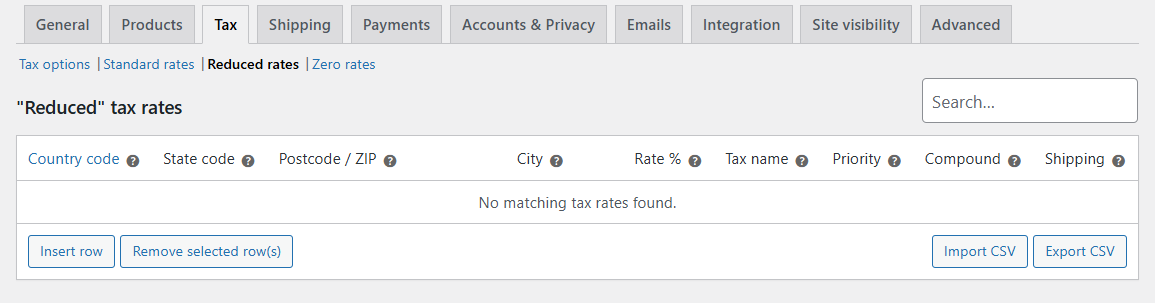
If you still don’t see the tax in the WooCommerce cart or checkout, edit the tax class to see if there are tax rates per country or one general tax rate if no specific country code is available.
Is there a list of tax rates?
You can read a professional blog about tax rates, and browse the internet to find the answer. It’s also possible to automate WooCommerce taxes with a plugin.
